Treadle Bobbin Winder

Bobbin winders are one of those accessories that really are more necessities.  You can wind a bobbin by hand, but your arm will tire before you are even close to done.  Also, the tension of the wound yarn will be all off which makes it difficult to use when you actually get to start weaving.  There are a few other ideas out there (like using a pencil in a hand drill), but I thought it would be best just to get a “real” one to get the job done right.

Again, new ones seemed out of my price range and used ones weren’t much better.  So, I started thinking:  I really just needed a tapered rod that would spin with a bobbin jammed on it.  Which made me think of treadle sewing machines which made me think about my Grandmother’s side table made from the treadle part of an old White sewing machine.  The top had seen its better days and wasn’t even in good enough shape to refurbish as a side table, but the treadle was actually in great shape having been powder coated when the table was created.  It was taking up room in my laundry room because I didn’t have the heart to do anything with it.  Now, I could see a new purpose for it: a treadle powered bobbin winder.

File_007

My biggest problem was not knowing the proper terminology for the parts I would need.  I knew they existed and what they looked like and even what types of things used them, but had no idea what they were called.  It took about a week for me to figure out all of the different parts and the names all the while having to modify the design I had in my head because the parts were either too expensive or just not going to do what I wanted them to do.  I settled on ordering a timing gear for a RepRap 3D printer, a couple pillow blocks in a matching diameter (the things that allow the rod to be stationary and yet spin), and a replacement belt for a treadle sewing machine.  The only thing I couldn’t find was the tapered shaft which as you may have guessed, is kind of a big deal.

So, thinking I know what’s what, I ordered a chrome plated aluminum rod.  When it came in, I found a machine shop in town and went in to see if they could mill it down for me.  That’s when the enormity of what I was asking hit me.  The guy was nice enough while I explained what I was trying to do.  At first, he had the “just hear the crazy lady out” approach until he finally realized what I was trying to do and then he got intrigued.  Sadly, he informed me that not all machine shops are made equally.  WHO KNEW?  There is apparently a huge difference between machine shops made for automotive needs and machine shops that are geared toward manufacturing.  Once I thought about it, it totally makes sense from a crafting point of view.  Just because you have a sewing machine and can make a quilt doesn’t necessarily make you equipped to whip up a ball gown.  It turns out, the only shops in town were automotive machine shops and I needed a manufacturing machine shop which generally only works in bulk and I only needed the one.

Feeling frustrated, I tried to change up my design, but the tapered shaft is the main thing. You just can’t do it without that piece.  As a last ditch effort, I emailed an acquaintance who actually teaches machining.  I knew he most likely only taught automotive machining because that is clearly where the demand is around here, but I was hoping he could point me in the right direction.  That’s when fortune shone down upon me.  He kinda understood where I was coming from and like the first guy, was intrigued by my crazy idea.  He asked to meet to see what I had and to see what he might be able to do about it.  I was SUPER excited because I had almost given up hope.

And then another problem, my hero thought he could create the taper on a rod, however, apparently chrome plated aluminum is not a machinist’s dream.  Luckily, he told me the steel I would need was readily available at Home Depot.  This meant I had to wait until I could meet with him again in a week or so, but there was dazzling light at the end of the tunnel.

After a trip to HD and a couple more weeks, my hero brought me a tapered rod that fit perfectly with all of my parts and held the bobbin like a dream.  I was beyond thrilled!  Now, I just had to assemble it and see if my idea worked at all.  (And then life got in the way for about 2 months – UGH!!).

Everything went together pretty quickly once I was able to get back to my grand scheme.  I found some old wood to elevate the pillow blocks to allow the larger diameter gear to move without touching the table.  I screwed the pillow blocks and wood blocks in place and put the rod through the pillow blocks with the gear positioned in the center.  I then used a Forstner bit (1″ maybe?) to cut two holes in the table top.  That hurt my soul a bit, but I consoled myself with the thought that at least the table was getting used now instead of collecting dust and laundry.  I took the treadle belt and threaded around the flywheel, through the two holes in the tabletop, then over the top of the gear.  I marked the length to cut and noticed that the belt rubbed against the inside edges of the holes.  So, I took the belt back off, cut it to size, and used a round wood file to enlarge and smooth out the inside edge of the holes.

Once I had ensured the belt would not rub on anything, I completely attached the belt.  It worked perfectly!  I now have a foot powered treadle bobbin winder.  Now, I can completely load a bobbin in just a few minutes with even tension.  I probably didn’t save any money in the long run, but it was a great adventure and I now have the coolest yarn prep area ever.

Tensioning Rods and a Raddle

I like warping my loom back to front.  My husband is super helpful and is nice enough to assist in warping when needed, but I hate having to ask for help.  It’s just a personal flaw of mine. So, I wanted to come up with a way to hold tension on my warp strands without requiring another set of hands while winding it onto the warping beam.

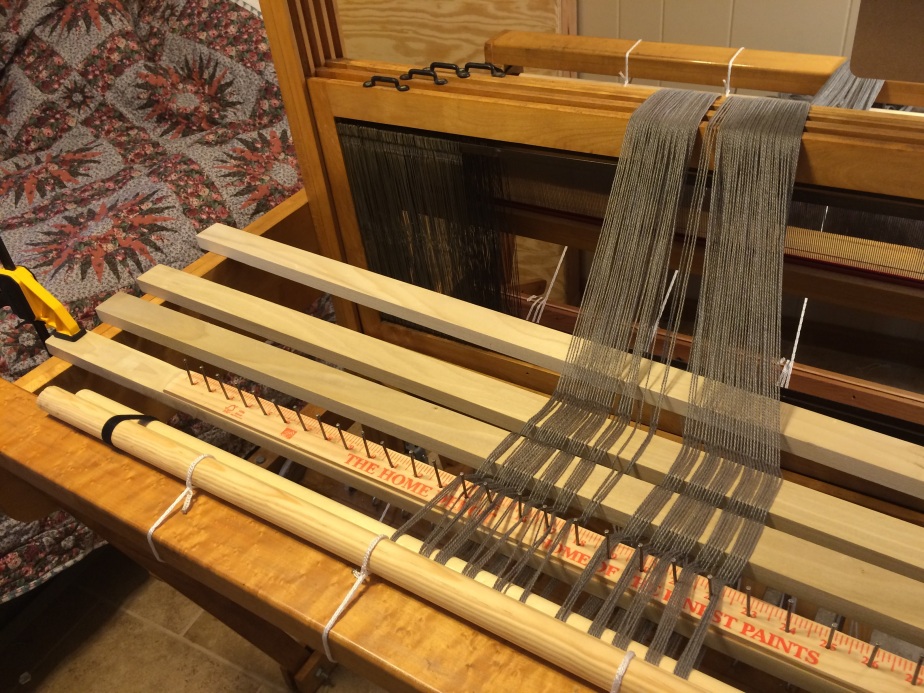
In researching, I found a tensioning box used to even tensions when warping on a sectional warping beam.  So I started thinking: I could use the same concept of keeping strands in order by using lease sticks, add a few extra rods, and the tension created by the strands moving up and under alternately would be enough to help even out and maintain the tension while I cranked the warp on.

I decided to use four 1″x2″ boards.  They are super cheap, easy to find, light, and easy to store.  Again, I asked my husband to help me out by cutting them to size and then sanding them smooth.  I wanted them to remain squarish because that would add a bit more drag.

At first, I didn’t have a raddle and just wound the warp on using 4 1x2s.  This turned into the warp drifting to the side.  This wasn’t really a noticeable issue until I have finished one scarf and noticed the next scarf was beginning to have a bit of diagonal look to it.  I minimized the effect by constantly have to reshift the warp as it was advanced.  Not a total disaster, but a slow and annoying process.

So, then, I decided to create a raddle by gluing a yardstick we had in the garage centered on top of one of the boards.  After it was set, I had my husband sand it again.  Then, I nailed into each point indicating an inch.

I can now easily wind a warp without extra help and without any huge problems.

IMG_2035

Making a Warping Board

When I first took up weaving, I thought a loom and a shuttle were really the only tools you needed to get started.  I quickly found that accessories that seemed like they were just helpful additions were actually necessities.  The first of these being a warping board (or some prefer warping mills).  Being broke and wanting to really get into my weaving, I decided to enlist my husband’s help in building a warping board on the cheap.

I started by researching what others have done.  Then, I took what I had found and created my own design.  My husband followed my plans and found some cheap hardwood and dowels at Home Depot to make it for me.

I added a few more dowels along the side than most people do.  I still have enough room to get my hand around each dowel without hitting my knuckles and it allows me to make  ridiculously long warps because I am really lazy and like to make a whole series of things off of one warp.  I added extra dowels along the bottom so that I could make crosses in either or both ends of the warp depending on how I felt like moving (arms higher or arms lower).

It is amazing.  My husband did a fantastic job building it for me and it works perfectly.

IMG_2037

Showing New Love for a Pre-Loved Loom

And the adventure continues…

Getting the loom out of the dining room, down the stairs, and into “the guestroom” which is a really nice and more efficient way of saying “the room that has a bed just in case someone decides to stay, but is mostly just cluttered with my craft stuff” wasn’t all that painful.  I took my time and cleaned each piece as I took it apart and carried it downstairs.  For the heavy pieces I enlisted my husband’s help and between the two of us, we got each piece relocated and ready for reassembly.  This part of the process took most of the day and I was really tired from the lugging and cleaning, but I was also obsessively determined to see it put all back together.

I had to alternate between pictures I had taken on my phone before I had completely disassembled it, researching parts and their function on the internet, and just plain old jigsaw puzzle skill, but within a few more hours, it was reassembled.  It still wasn’t in good working order, but everything was in its proper place.

To get the loom into true working order, I needed to  make a few modifications.  First, I replaced almost all of the bolts and screws.  Then, I had my husband saw all of the pegs off the sectional warping beam and sand it smooth again.  I really hated to do this because it was clear the builder had worked very hard to make it perfect, but not only was I not ever intending to use the amount of warp needed to make that function useful, I also kinda broke a few pegs when I dropped the warping beam on my leg while trying to seat it properly and nearly impaled myself.  Who knew weaving could be so dangerous?  Thankfully, I had a thick pair of jeans on and only got a few nice bruises because that injury would have been really hard to explain at the ER.

IMG_2029

Another modification I made was adding felt strips to the bottom edge of the harnesses.  This significantly reduced the amount of noise the loom makes while treading.  I was worried that the added felt would somehow make the harnesses wobble more or slip off the jack, but this setup works perfectly well.

IMG_2030

I also ordered a roll of Texsolv to change out all of the ropes used in the tie-ups.  This makes it a little easier to change my tie-ups.  I also used the Texsolv to replace the worn out apron fabric.  I asked my husband to cut down some 1″ diameter dowels to replace the apron rods.

IMG_2034

It has been 6 months since I rebuilt the Birdseye loom.  It has been working like a charm and I believe I have found my craft.  I recently added a couple 3M Command Caddies to hold my phone and small supplies on to the castle.  I used some heavy duty 3M Command strips to attach a clipboard to hold my notes and patterns, as well as a magnetic knife strip to hold my thread nippers, tapestry needle, and a few sewing pins.  This makes everything very easy to access and keeps me from knocking stuff off the top of the castle onto my work all while not doing any permanent damage to the beautiful wood.

IMG_2033

Weaving – In the Beginning…

It all started with a surprise Christmas present shipped in a clearly marked box.

My husband had ordered a Schacht Cricket rigid heddle loom for me through Amazon.  Unfortunately, it came in its own box not disguised in the non-descript Amazon packaging he expected.  So, two weeks before Christmas, I came home to find my Christmas present sitting on the front porch taunting me with promises of destroying my long neglected stash of yarn.  I immediately did a super happy dance and perhaps squealed like a little girl, but I was able to resist the urge to rip into the box right then and there.  My husband came in an hour later and was surprised to see me sitting at the dining table longingly staring at the loom’s box.  I tried to play it cool for the next hour reassuring him that I could totally wait until Christmas and still be super surprised Christmas morning while he went through all of the stages of accepting that his grand surprise gesture had failed.  Finally, he could tell that I had truly been surprised and was going to die if I didn’t get to open it up right then and get to work.  So, I spent the entire Christmas Break learning everything I could on weaving and knocking out scarf after scarf.  I was super hooked.

Being the obsessive hobbyist that I am, much like a certain potato chip, I couldn’t stop with just one.  I loved the little loom my husband had gotten me (and still do), but I had to have more.  So, I started looking at buying a new four shaft floor loom.  Let’s just say that my bank account cried with laughter when I found the one I wanted.  So, with a new one being out the question, I began researching used options.  Again, I hit the money wall because most refurbished ones are still above my pay grade.  My obsession being stronger than my brain, I started researching how to locate and refurbish an overly loved model.  This is when fortune smiled down upon me.  I stumbled upon a listing on Ebay that was actually in decent condition within a few hours drive from where I lived.  It was a handmade loom built from beautiful birdseye maple with 4 shafts and 6 treadles.  It was perfect and I won it!  The only problem was I would have to disassemble it myself, move it out of the owners’ shop, haul it back in a vehicle large enough to fit it (which I did not own), get it out of said vehicle, through our house, and down to the basement where I would have to reassemble it all while knowing nothing about how a floor loom actually works and with no instruction manual to refer to for guidance (it being handmade) all during a snow storm which in Arkansas means no one leaves the house for any reason short of imminent death.  So I called up my Dad who is the only man who loves me enough to agree to such a completely demented undertaking (other than my husband who had to watch the kids while I tried to kill myself for a loom).  And of course, he completely backed me up and told me it was a great plan and we could easily get it done, “sounds like fun,” because he’s my dad and would never tell me I’m being completely insane (possibly because the sanity thing could be a genetic issue.)  So, we got up early the next morning and made our way through the slush in Dad’s van safely to our destination in a little over 3 hours.

I was super nervous about buying something so expensive off of Ebay with only pictures to go by especially since I had next to zero idea what I was actually looking at in each pic.  Also, the guy I bought it from sounded nice enough in emails and over the phone, but don’t most crazed axe murders??  When we arrived, I was so thrilled to meet the nicest couple ever and see a gorgeous, well-loved, but clearly working loom.  She was a quilter and had a shop full of gorgeous fabric that kept catching my eye and he had a shop next to it where he was working on old cars.  She explained that her grandfather had been a woodworker and had gone to Scotland to see where their family had come from way back when.  While there he met some weavers and fell in love with looms and weaving.  When he came back, he researched looms and eventually started building them.  Her husband had rescued it from the basement after her grandfather had passed and moved it halfway across the US to put it back together in their shop.  He even took weaving lessons and liked making rugs.   Unfortunately, the noise was bothersome and he had quit using it all that much and so they decided they needed the space so they had sold it.  This was just meant to be.  I love furniture that has a history and has clearly been loved by its owners.  Honestly, it made me nervous a bit while taking it apart because I was worried I might break something in the process and see their hearts break in front of me.  However, taking it apart was pretty straight forward and we got it into the van with just a bit of hard work and only a few curses dropped under our breaths.  After our goodbyes and assurances that I would take good care of it, we left and made our way back home without any problems.

Now, just getting to this point had taken most of the day.  It was getting dark by the time we got back home, but there was no leaving it in the van overnight.  So, there were a few more curses dropped while we unloaded than we had dropped in the loading, but eventually we made it into the house.  We decided to leave it upstairs in the dining room because we were all too tired to fight getting it down the stairs and all the way to the back of the basement.  At any rate, I had my loom and I loved it already.

IMG_5323

To be continued…

Beauregard, The Crafting Bird of Happiness

beau

Beauregard, The Crafting Bird of Happiness, my family, and I would like to welcome you to The Fiber Garage.  We hope to spend many hours weaving, knitting, crocheting, sewing, quilting, crafting, building, and rescuing pre-loved furniture in our little garage.  We will be sharing our (mis)adventures with you here.  I hope you have as much fun reading this blog as we do in our home-attached-to-home.

A little bit about Beauregard:  He is named after Violet Beauregard because he loved reading Charlie and the Chocolate Factory and, well, he looks like a giant blueberry.  He has been named the official mascot of craft night and takes his inspirational and motivational duties very seriously.  He loves quiet nights curled up with a nice soft ball of yarn and a glass of wine.  He hates whiners.